Pages

Monday, May 24, 2010

Elmer the Elephant


Another favorite....
I always read Elmer by David McKee to my K kids-great book.  So after we read the book we create our own Elmer the Elephant. 

First, we do a tissue paper collage.  This usually takes one full class period (40 min), sometimes more but I encourage the kids to complete it in one class.  Materials needed: 12 x 18 inch paper and lots of tissue paper and watered down glue.  The kids paint the paper, lay the tissue paper down and then paint over the tissue again.  We let the papers dry. During the next class the kids flip the tissue paper collage over and trace an elephant on the white side.  They cut this out.  I have them cut out an ear too.  I attach the ears for them because we make them 3D.  We also give our elephant a google eye!  Who can resist a google eye?!
Finally, we use oil pastels and draw a place for our elephant to live.  Elmer needs a  home of course!  We talk about horizon lines, trees and types of animals Elmer might encounter.


More photos to be posted later.

Thursday, May 20, 2010

Royal Pooches


Well, since I am a huge dog lover I had to try this with the kids. I saw it some where else but of course, true to form, I cannot remember where. Thanks to whomever was doing this.


We drew the dogs together with oil pastel and then the students painted. I asked the students to include a horizon line too. Each one is unique!


Weaving Plates


So with 2nd grade this year I decided to try weaving on paper plates.  We used the Chinet plates because they are sturdy.  A little more expensive but worth it.

The kids really took to this project and had fun picking their own colors for the weaving.  A few of them struggled, but for the most part they all did awesome!  Some were so into it that they decided to weave the entire plate!
I asked them to warp their plate, weave and then put a pattern on the exposed paper plate.  They were to try and weave about half way out.  Funny, the hardest part for some of them was putting the yarn through the eye of the needle. 

Here they are.....


Monet Water Lilies

I love, love, love doing this lesson with my students.  They seem to enjoy it equally too.  Since kids love glitter I always mix some glitter into our paints. 

We start the lesson by talking about Claude Monet and Impressionism.  We talk about how he painted and what he painted.  Since the Carnegie Museum is right around the corner, many of the kids have seen some of Monet's work and recognize it.  The first part of the lesson I give the kids green, turquoise, blue and white paint mixed with glitter of course.  I ask the students to fill an entire 12 x 18 inch piece of paper with the paint but they are supposed to dab the paint on, allowing it to mix together.  We let these dry and complete the painting during the next class.

The next class, I give the kids white, pink, yellow and green paint.  We start by making about 7-10 white flowers.  Again we dab the paint on in a circle.  Next we dab the yellow on the white, allowing the colors to mix.  Then we dab some pink on top of those colors.  Finally, we paint a green smile below the flowers for the lily pad. 

These always turn out so well.  Plus, we always get lots of compliments on them!


Wednesday, May 19, 2010

Cakes, Cakes, Cakes


Yum! Who doesn't love cakes? Even if you don't like eating cake (what's wrong with you??? ha ha) they are always a treat to look at.  I love Wayne Thiebaud!  Students always enjoy looking at his sweet treats.  So in an effort to teach the kids about painting: color mixing, tints and shade- I do this delicious cake lesson.

Procedure:
Demo how to draw a 3D cake (cylindrical or cube).  I require the kids to have a background, table and plate.  I ask them to create a pattern either on the table cloth or the wall.  They also have to decorate their cake.  Imagine your favorite birthday cake....

I discuss and show how to mix paints then I let the kids experiment with color mixing.  Most kids don't have many opportunities to mix paints so this might be the first time they are given the freedom to experiment and see the results. 

We paint the background first and do the cake last. 

Here are our DELICIOUS results (some in progress but I just couldn't resist!):


Large Scale Mosaic


While teaching at the senior high school, I had the opportunity to work with five students and create a 6 foot round mosaic in the entrance of our school.  I recently had my article published in School Arts Magazine.  Check out the article and images.

http://www.schoolartsdigital.com/schoolarts/201003/?pg=34&pm=2&u1=friend

Thanks for looking!

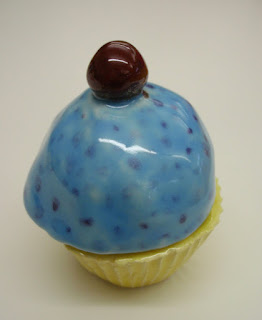
Clay Cupcakes


Aren't these adorable????

For our 4th grade clay project this year I decided to try these cute clay cupcakes.  They were so easy and fun.  The students loved them and made them as gifts for Mother's Day.  I purchased 24 silicone cupcake liners at the local craft store for this project. 

Procedure:
Begin by showing the students how to create a pinch pot.  Rolling a small piece of clay (about the size of a golf ball) into a sphere.  Using your thumb, put a hole in the center but don't go the whole way through or you will have a donut!  Drop the ball of clay into the cupcake liner and begin pinching and turning so that it takes the shape of the liner.  Once the clay extends over the top edge, cut the extra off so you have a flat edge.  Next, you will need to make the top (or the icing) this time you are just going to make a pinch pot.  Start the same way but you will not drop it into the liner this time.  You will just pinch and turn the clay to form a bowl shape.  Checking every so often to make sure it doesn't get larger than the cupcake base.  The last step is to add the cherry.  Make sure you slip and score!

I fired the cupcakes (after taking them out of the liners of course) and the students glazed them during the next class.  We used browns, pinks, blues, yellows and white.  Then we added drops of glaze for the sprinkles. 


Woven People


My kids love weaving! Using cardboard looms that I made from scrap matt board my kids learned how to warp their loom and weave using a simple over-under pattern. The kids decided if they wanted a pattern or not. They also had the choice of making their weaving into a dress or pants/shorts. We talked about how to make the weaving into pants/shorts rather then a dress by splitting the weaving half way through.


Procedure:
First, we warped our loom.  The kids measured out about 6 arms lengths of yarn in the color of their choice to do this.  Next, we talked about weaving using a simple pattern of under, over, under, over.  The students worked on these for about a month (I only see them once every 6 days, which isn't too much time) but they had a blast and loved the results.


Clay Turtle Rattles


These are so adorable!!! So all kids love to do clay projects and I saw this somewhere (although I cannot remember where. Thanks to whoever had this idea!)

Procedure:
I made turtle tracers for the kids out of oaktag and demonstrated for them how to roll out a slab and cut out the turtle shape. The kids then made small beads (about 15) and gently laid them in the center of the turtle. Then we made little pinch pots and slipped and scored them to attach them to the turtle. Finally, the kids used a carving tool and added some kind of pattern to the back of the turtle.

The turtles were then fired in the kiln. The next class the kids glazed them with greens, browns and yellows.

Some of the beads got caught inside the turtle because the kids pressed the beads down or caught them in the attachments.

Overall, they turned out great and the kids love them!

Did I mention we managed to make these in one 40 minute class period??? I have about 125 3rd grade students so it was necessary to complete them in one class period because I do not have enough storage space.