Pages

Wednesday, October 27, 2010

Multimedia Presentation

Multimedia Project using the FlipCamera

We recently acquired some flip cameras here at our school.  I have decided that I am going to have one of my 6th grade classes try out a project I have been thinking about.

So the goal is to have the student learn about art history.  Each team (of two) will have a choice in what they would like to do.  They can:
  1. Select a painting and bring it to life.  Videotape the skit and narrate it. 
  2. Become an artist and be interviewed.  Researching information on the life, time period, art work, etc.  Recording the interview on the flip camera.
  3. Write a short story based upon a masterpiece and read it to the class.

I am still looking to add some additional options.  So if anyone has some suggestions, I'd love to hear them. 

Saturday, October 23, 2010

Art Inservice Program with Dr. Catherine Richmond-Cullen


This past Friday the GLSD Fine Art Department hosted our first Art In-service.  Tired of sitting through many, many in-service programs that do not pertain to our content area, Dr. Catherine Richmond-Cullen presented the 12 Brain/Mind Learning Principles focusing specifically on the arts.  Dr. Richmond-Cullen is from the Scranton area.  She brought her friend and colleague, Liz Parry-Fiast.  Both women are fantastic and work well together.  Cat is a dynamic speaker and can make any content come to life.  This is a rare gift.  I aspire to be just as entertaining and informative in my classroom.

We had approximately 50 participants from other schools attending-all art teachers and music teachers.  This was a perfect number for the type of program that Cat presents.  She and Liz really do an outstanding job of presenting information and modeling exactly what they teach.  Our day was filled with excellent information on the 12 Brain/Mind Learning Principles and the arts. 

We were inspired, informed, entertained and excited. 

For more information on the 12 Mind/Brain Learning Principles please click the link:
http://www.cainelearning.com/files/Learning.html

Here is a look at our day....


Tuesday, October 19, 2010

3D Paper Masks


3D Paper Masks

This is a fun project to do with students in grades 4, 5 or 6.  I did this with 4th grade. 

You will need:
glue
construction paper in various colors
hole punch
scissors
pencils

We began by discussing masks and what they might be used for: Halloween, parties, ceremonies, etc.
To make our masks we cut a large oval from construction paper.  Then we cut a small triangle out of the top and bottom of the oval.  Fold the mask in half and then glue the cut edges together.  This will make your mask 3D.  You can do this step last or first.  Depending on the storage space you have. 

The best masks have a lot of attention to detail.  So we start by cutting out shapes for the eyes.  Think of this as eyeshadow.  Then make the eyes.  A football shape with a pupil on it.  Add some fun details to the mask: dots are a good idea.  We used the hole punch to punch out lots of dots.  Add eye brows of some sort.

Next make the nose.  A long triangle shape works well for the nose.  Make it symmetrical so you can fold it in a half and glue it down.  Then make the mouth.  Again fold it in half so it is symmetrical.  You can make all of the features 3D by gluing the edges down rather than the entire thing. 

Last, we add hair and lots of fun details.  The hair can be many colors or
one color: straight, curly, crimped, etc.  Have fun with it!

Here are our wonderful masks!  Enjoy!


Saturday, October 16, 2010

Primary Hands


PRIMARY HANDS

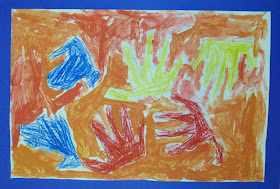
Kindergarten learns about the Primary and Secondary Colors by creating their Primary Hands. 

To begin we trace our hands 6 or 7 times on a 12 x 18 inch piece of drawing paper.  Next, we outline our hands with red, yellow or blue (primary colors) oil pastels and color them in.  This usually takes us one 40 minute class. 

During the next class we talk about mixing the primary colors.  What happens when you mix red and yellow? Blue and yellow?  Red and blue?  We make new colors!  This is why the Primary Colors are so very important!  Because with them we make the Secondary Colors: green, purple and orange.

I give each student their own paints: two primary colors.  They each get to mix the paint and discover what new color they can make.  They paint around their Primary Hands with their Secondary Color. 


Friday, October 15, 2010

Cave Art


CAVE ART

The first artists were the cave men. We discuss and examine the images found at Lascaux.  To see the Lascaux Caves in France please click the link.  This is one of the largest discoveries of cave art in one location.

http://www.lascaux.culture.fr/index.php?lng=en#/fr/00.xml

We talk about what the cave men & women may have used to paint since they didn't have stores with paint brushes & paints.  I show images from the Lascaux Caves and we practice drawing animals on white drawing paper.  Then we create a texture rubbing and wrinkle our papers so they feel a bit bumpy because the cave men drew on bumpy walls.  Finally, we use oil pastels to draw our cave art.

I create a cave in my classroom for the kids to experience what it might have been like for the cave men and women to be in a dark area and try to paint or draw.  We hang our cave art in the cave and admire all the beautiful drawings!


Thursday, October 14, 2010

Sterling Silver Leaf


This is one of my favorite pieces.  I made this about 2 years ago and keep thinking I need to make some more.  Oh, if only I had a studio.....

Wednesday, October 13, 2010

Amusement Park Sculptures


AMUSEMENT PARK SCULPTURES

My first graders are learning about 2D art and 3D art.  We discuss what the difference is and see examples of both. 

In order to illustrate how something 2D can become 3D we use colored construction paper strips.  The paper strips are 2D because they are flat, but we can make them into 3D sculptures by manipulating them.  We roll them, fold them, intertwine them, anything we can think of! 

I tell the kids to think of their sculpture as an amusement park.  Make as many loop-d-loops as possible! Think of each strip of paper as a ride. 

This is a one day project.  The students take them home with them when they leave.  I try to send home some extra strips of paper because so many of the students want to keep working. 

These are are projects in progress.


Monday, October 11, 2010

Paint Your Own Rainbow


What does it mean to
Paint Your Own Rainbow? 

It means that you....
reach for your goals; that you are independent; a free thinker; above peer pressure.

Saturday, October 9, 2010

Fall Reflections-Monoprint


1st Grade is learning about PRINTMAKING by creating a fall scene reflected in water. 

Materials Needed:
Brown Oil Pastels
8 x 12 inch drawing paper
Tempera Paints-red, yellow, orange, green and blue
Bone folder

To create our print we began by folding our paper in half -either way works fine.  Open your paper back up and draw 5 "Y" trees on the center crease.  If you can make the letter Y you can make a tree! Add some extra Ys onto your trees to make some branches.  Now, fold your paper back in half-make sure the trees are inside.  Using the bone folder rub the trees so that they reflect onto the bottom half of the paper.  Sometimes you have to rub them 2 or 3 times. 
Now, you are ready to paint!  Remember you are only painting the top half (where you drew the trees). Start with the leaves.  Paint dabs of red, yellow and orange on the branches and around the branches.  Next, paint the grass and hills.  Finally, paint the sky.  Now fold your paper in half and gently rub to transfer the image to the bottom half.  Open it back up and it will look like a reflection!  Allow to dry and admire :)

Friday, October 8, 2010

Quilt Squares


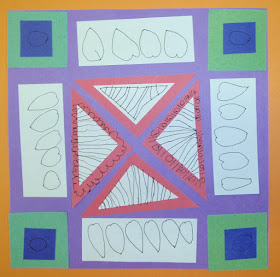
We talk about quilts as we continue to learn and study shapes in art class.  Quilts have beautiful examples of shapes.  They are also a great way to introduce the idea of decoration vs. function.  Most children have a quilt in their homes and a few have one hanging on a wall. 

I show examples of traditional quilts with very specific layed out patterns as well as non-traditional quilts.  There are many, many fabulous quilts out there!

We each make our own quilt square out of construction paper.  Although the pattern is the same our quilts always look very different.  We add stitching to our quilt using a felt tipped marker.  This is another opportunity to discuss patterns and shapes. 

Here are some examples of our beautiful quilts!


Thursday, October 7, 2010

Monet Style Fall Trees


Monet Style Fall Trees

I do this lesson just in time for fall- of course.  My second grade classes have just started this.  Although, this year I am trying it a little differently.  These are pictures from last year and although I like the way they turned out I was looking for a way to incorporate the leaf rubbing into the overall look and finished piece.


Materials Needed:

Drawing paper (or tracing paper)
Tempera Paints: red, yellow, orange, green
Oil pastels: brown and black or brown paint (for the tree)


So here's how to make your Monet Style Fall Trees:

  1. Draw or paint the tree on your paper, using brown oil pastel or brown paint.  A good way to make a tree is to start with the letter Y.  Then add some more Ys onto the tree for branches.  You may need to thicken up the tree trunk and branches so it looks a bit more natural.
  2. Next, paint leaves by dabbing (Monet used dabs of paint) red, yellow and orange on the branches and around the branches.  You might even make a few leaves fall off the tree since it is fall after all!
  3. Now, paint the grass around your tree.
  4. Allow to dry.
  5. During our next class we do leaf rubbing on a large piece of construction paper and use this to frame our paintings.
Here is how our paintings will be different this year.
  • We are painting on tracing paper this year. Our tracing paper looks frosted; it's not clear. This will allow our leaf rubbings to show through and create a layered look.

Tuesday, October 5, 2010

Monochromatic Bubble Lettered Cursive Name Painting


Right now my 6th grade students are creating a Monochromatic Bubble Lettered Cursive Name Painting.  How's that for a title?! They learned about Tints, Shades and Monochromatic Color Schemes. 

Each student created his/her name in cursive bubble letters and then outlined the name in Sharpie Marker.  Next, we begin painting.  Starting in the center of the name we paint the color without any white or black.  Then, going to the right we gradually start to add white to the paint to create a TINT of the color.  Paint a letter, add more white, paint a letter, add more white, etc.  On the left we use the SHADE of the color.  So gradually add black to the color and paint the letters.  Once the painting is done we use sharpie to create a checkerboard background.  The black sharpie helps keep with the Monochromatic theme!